Hurricane Electric on SmartOS


Hurricane Electric (HE) is a global Internet Service Provider that offers free IPv6 connectivity from most of its points of presence through IPv6-over-IPv4 tunnels.
This is a short guide on setting up simple IPv6 connectivity for a SmartOS Zone (or specifically, for a Zone configured as a router) through HE's tunnelbroker.net. We will cover the following points:
- Setting up an account with Hurricane Electric's Tunnelbroker service.
- Configuring a SmartOS Zone to establish it's side of the tunnel end-point on boot.
- Configuring a SmartOS Zone to advertise it's IPv6 prefix and forward IPv6 packets.
- Securing private IPv6 networks from the public Internet.
For now, we will not be addressing cases where you have an ASN. When we're done you should have IPv6 connectivity for a single host, a network, or several networks.
Register with Tunnelbroker
The registration process with Tunnelbroker is pretty simple and easy, visit https://www.tunnelbroker.net/ and click on register, you will be prompted for around a dozen fields of information, and then an email will be sent to you containing your account password.
After you've logged in, select "Create Regular Tunnel" from the user functions list on the landing page.
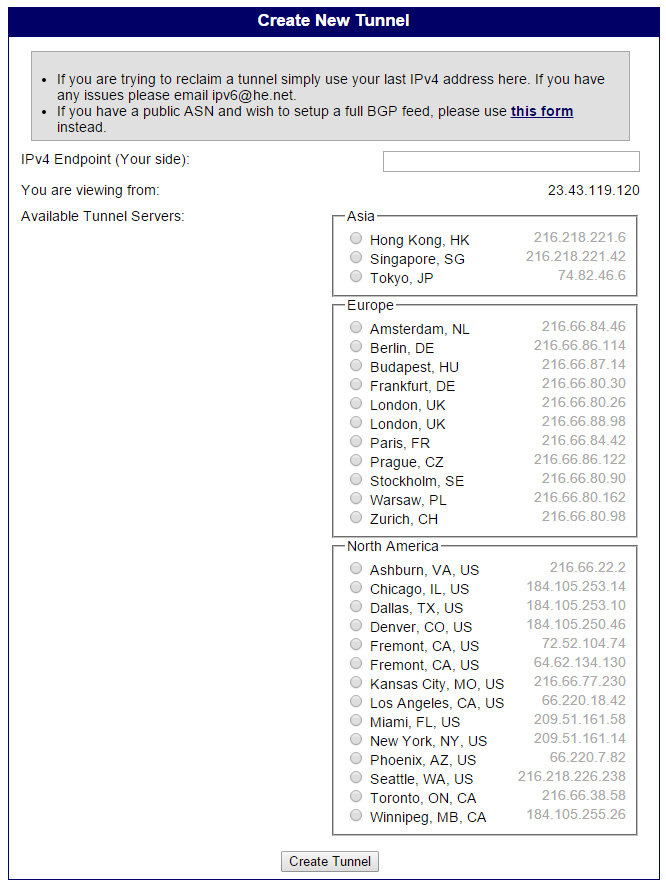
Enter in your IPv4 endpoint and select a tunnel server from the list that is geographically close. If you like, you can ping from your SmartOS install and select based on the lowest latency host, or the host with the fewest hops from yours. Once you've selected a tunnel server, click on "Create Tunnel" to continue.
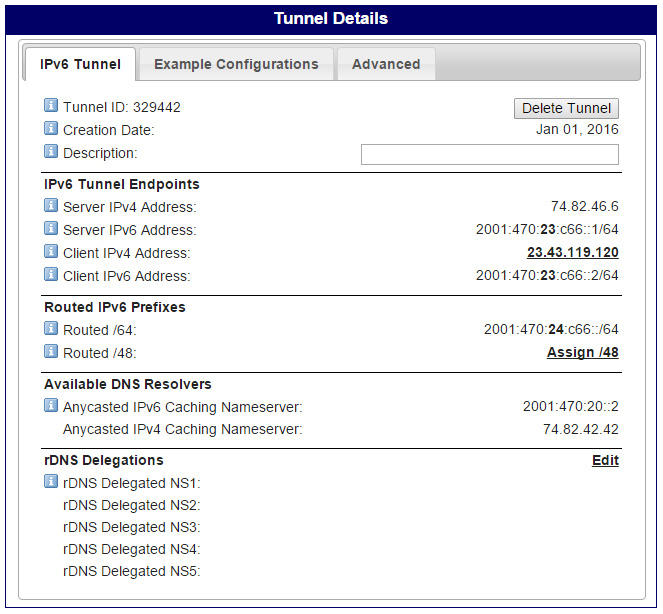
On the tunnel details page, take note of the Server and Client IPv4 and IPv6 addresses. If you're planning on setting up IPv6 service for a network, take additional note of the Routed /64 prefix.
If you plan on running several IPv6 network segments, assign and take note of your /48 prefix. Both IPv6 auto-configuration and DHCPv6 require a minimum of /64 per network segment, so a /48 will allow you to sub-divide it into several networks.
If you would like to handle your own reverse DNS for your /64 or /48 networks, you can specify your DNS servers in the rDNS Delegations section. The specifics of this are well beyond the scope of this guide.
Configure an IPv6-over-IPv4 Tunnel
The example configurations provided by Tunnelbroker for Solaris utilize depreciated commands. Use the following commands instead.
[root@router ~]# dladm create-iptun -T ipv4 -a \
  local=23.43.119.120,remote=74.82.46.6 v4_he0
[root@router ~]# ipadm create-addr -T static -a \
  local=2001:470:23:c66::2,remote=2001:470:23:c66::1 v4_he0/v6
[root@router ~]# route -p add -inet6 default 2001:470:23:c66::1
add net default: gateway 2001:470:23:c66::1
add persistent net default: gateway 2001:470:23:c66::1
At this point, you should have full connectivity to the Internet via IPv6. Additionally, these changes persist across system reboots.
Configure a SmartOS IPv6 Router (optional)
If the SmartOS Zone you've established tunneled IPv6 connectivity to is acting as a router for one or more networks, it may be preferable to configure it to forward packets to clients as well as advertise as an IPv6 capable router.
While we could use ipadm to manually set up the link-local addresses for us, it would probably be better to configure our zones to configure their own link-local addresses. Ensure that you have addrconf set on your router's private network interface.
gz# vmadm update UUID <<EOF
{
  "update_nics": [{
    "mac": "mac_address",
    "ips": [ "addrconf", "ip_address/netmask" ]
  }]
}
EOF
Forwarding IPv6 Packets
...Is impossibly difficult to configure for SmartOS...
[root@router ~]# routeadm -u -e ipv6-forwarding
Advertising as a Router
This can be done through Neighbor Discovery (stateless) or DHCPv6 (stateful/stateless). I prefer the simplicity of the stateless Neighbor Discovery Protocol (NDP) which happens to be well supported in SmartOS.
Edit /etc/inet/ndpd.conf, replacing net1 with the interface you want to advertise on and the prefix with your Tunnelbroker provided prefix.
if net1 AdvSendAdvertisements 1
prefix 2001:470:24:c66::/64 net1
Restart NDP to take on the changed configuration.
[root@router ~]# svcadm restart ndp
At this stage, you should have IPv6 connectivity inside your network being routed through this tunnel.
If there is serious interest in using DHCPv6, I will expand this guide to encompass that as well.
Securing a Private IPv6 Network (optional)
Note: As of this writing, IPFilter on SmartOS isn't properly filtering IPv6 traffic and this section is incomplete.
With the historically wide deployment of IPv4 Network Address Translation (NAT), one of the most significant differences between using IPv4 and IPv6 is the uniform addressability of the later.
Specifically, consider that traversal from the public to the private side of a NAT is only possible with explicit configuration. In contrast, by default, every IPv6 device is addressable and connectable by every other IPv6 device. Fortunately, each /64 address space has 2^64, or roughly 1.844 * 10^19 possible addresses, making guessing the addresses of computers inside your network nearly impossible by brute force methods unless they've been statically set at an easy to guess address.
Fortunately, we have an old solution for this problem.
Edit /etc/ipf/ipf6.conf and add the following:
# By default, block all incoming traffic on v4_he0
block in on v4_he0 all
Restart or enable ipfilter to enable changes.
[root@router ~]# svcadm restart ipfilter